
A PNGTuber doesn’t need face tracking or complex rigging to feel alive.
What makes a PNGTuber engaging is reactive behavior—especially how the avatar responds when you speak.
A proper PNGTuber reactive image setup in OBS allows your character to move, blink, or change expressions based on audio input, creating the illusion of responsiveness with minimal hardware and zero facial tracking.
This guide walks you through the entire PNGTuber reactive image setup process, from asset preparation to OBS configuration, common mistakes, and optimization—so your PNGTuber looks professional, stable, and stream-ready.
If you haven’t chosen a model yet, start with PNGTuber cost explained before continuing.
What Is a Reactive PNGTuber Image?
A reactive PNGTuber image is a static character image that switches states based on microphone input or triggers.
Typical reactions include:
- mouth opening when you speak
- blinking during silence or speech
- expression changes on loud audio
This system is lightweight, beginner-friendly, and ideal for creators on low-end PCs.
Why PNGTuber Reactive Setup Matters
Without reactive behavior, a PNGTuber:
- feels static and lifeless
- looks disconnected from audio
- reduces viewer immersion
With proper reactive setup:
- speech feels synchronized
- viewers intuitively understand reactions
- your avatar feels “present” on stream
Reactive setup is the core of PNGTuber quality, not art complexity.
What You Need Before Setting Up Reactive Images
Before opening OBS, confirm the following:
Required Assets
- PNG (idle / mouth closed)
- PNG (talking / mouth open)
Optional but recommended:
- blinking states
- emotion variants
👉 Related guide: pngtuber blinking setup guide
Required Hardware
- working microphone
- stable audio input
👉 Fix audio issues first: vtuber mic not working
How PNGTuber Reactive Images Work in OBS
OBS does not “animate” PNGTubers.
It switches image sources based on audio conditions.
Reactive logic usually follows this flow:
- Microphone detects volume
- OBS filters trigger visibility change
- Image A hides, Image B shows
No face tracking. No AI. Just logic.
Step 1: Prepare Your PNG Files Correctly
Your reactive setup will fail if your images are not prepared properly.
Image Requirements
- Same resolution and canvas size
- Same character position
- Transparent background
- Identical file format
Mismatched images cause:
- jumping
- flickering
- misalignment
👉 File prep help: vtuber model file types & export guide
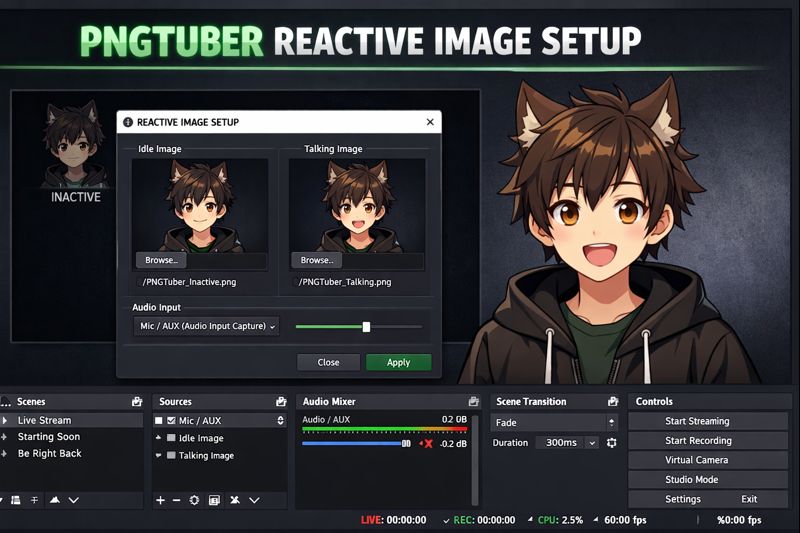
Step 2: Add Your PNG Images to OBS
Inside OBS:
- Create a new scene (PNGTuber Scene)
- Add Image Source → Idle PNG
- Add Image Source → Talking PNG
- Stack them in the same position
At this stage, nothing reacts yet.
Step 3: Set Up Audio Input Correctly
Reactive PNGTubers depend entirely on microphone input.
Audio Setup Checklist
- Mic selected in OBS settings
- Monitoring enabled (if required)
- No conflicting audio sources
If your PNGTuber doesn’t react at all, audio is almost always the issue.
👉 Troubleshooting guide: vtuber mic not working
Step 4: Configure Audio-Based Visibility Triggers
This is the heart of the reactive setup.
Basic Logic
- Idle image visible when silent
- Talking image visible when volume exceeds threshold
How It’s Done
- Apply audio monitoring or volume-based filters
- Use visibility toggling logic
- Fine-tune thresholds
Key tip:
The goal is natural response, not instant switching.
Avoid:
- constant flicker
- rapid toggling
- delayed reactions
Recommended Audio Threshold Settings
Start with:
- Minimum speaking volume only
- No reaction to breathing or background noise
Fine-tune until:
- mouth opens when you speak
- stays closed during silence
Over-sensitive setups cause:
- mouth flapping
- viewer discomfort
Step 5: Test Reactive Behavior Inside OBS
Do not rely on preview windows.
Test Scenarios
- whispering
- normal speaking
- laughter
- silence
Watch for:
- delayed reaction
- stuck states
- flickering
👉 OBS-related fix: vtuber obs vtuber model not moving
Common PNGTuber Reactive Setup Problems
Mouth Not Moving
- Mic not detected
- Wrong audio source
- Threshold too high
👉 Fix guide: vtuber model mouth not moving
Constant Talking Animation
- Threshold too low
- Background noise triggering
- Mic gain too high
Lag or Stutter
- OBS overloaded
- Too many sources
- High output resolution
👉 Performance fix: vtuber low fps fix
Adding Blinking to Reactive PNGTubers
Blinking should not rely on audio alone.
Best practice:
- timer-based blinking
- separate blink images
- short blink duration
👉 Full tutorial: pngtuber blinking setup guide
Beginner-Friendly Reactive PNGTuber Setup
Recommended for beginners:
- 2 images only (idle / talking)
- audio-based switching
- no expression stacking
👉 Beginner path: vtuber setup for beginners
Advanced PNGTuber Reactive Techniques
For experienced creators:
- layered expressions
- hotkey-based emotions
- audio + timer hybrids
These techniques increase personality without increasing system load.
PNGTuber Reactive Setup vs Live2D Tracking
| Feature | PNGTuber Reactive | Live2D |
|---|---|---|
| Facial tracking | No | Yes |
| Hardware needs | Low | Medium |
| Setup complexity | Simple | Complex |
| Performance cost | Very low | Medium |
If you want expressive motion without tracking, PNGTuber is ideal.
👉 Comparison: PNGTuber vs Live2D VTuber models
OBS Optimization Tips for PNGTubers
To keep streams stable:
- limit image sources
- avoid unnecessary filters
- keep resolution reasonable
👉 OBS tuning guide: vtuber bitrate settings for obs
Final Thoughts
A PNGTuber does not need complex animation to feel alive.
What matters is responsive behavior.
A clean PNGTuber reactive image setup in OBS:
- synchronizes voice and visuals
- improves viewer immersion
- works on low-end hardware
- scales easily with your content
If your PNGTuber feels stiff, the problem is almost always setup—not the art.
Recommended Internal Links (Anchor Text Ready)
- pngtuber blinking setup guide
- vtuber mic not working
- vtuber model mouth not moving
- vtuber obs vtuber model not moving
- vtuber low fps fix
- vtuber setup for beginners
- PNGTuber vs Live2D VTuber models